
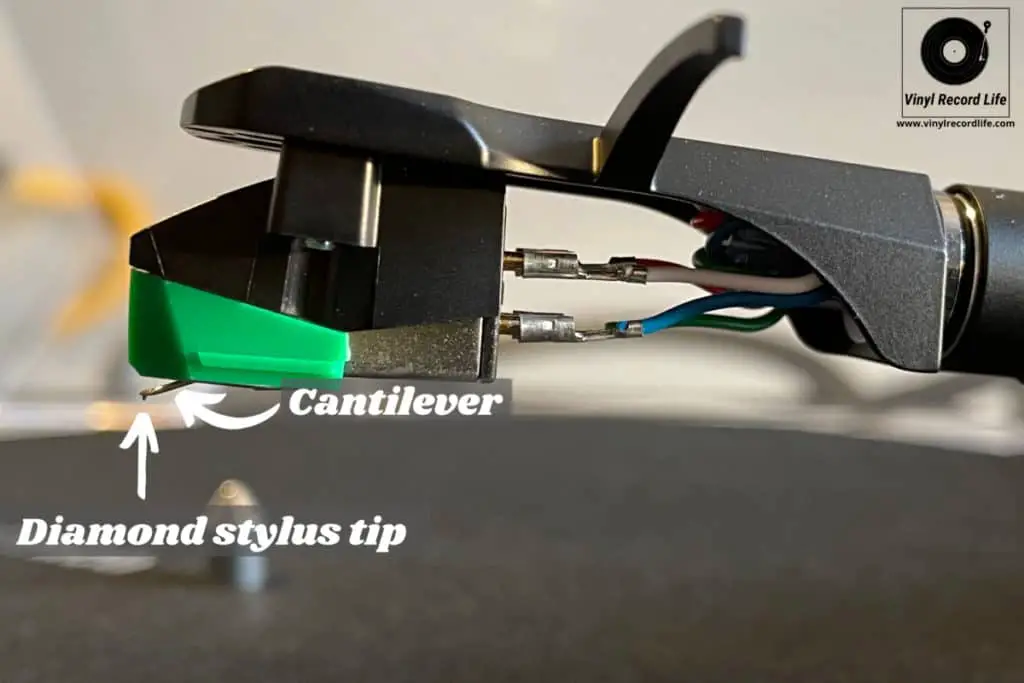
The needle – or stylus – on your record player or turntable is one of the most important parts of your whole set-up.
As with all moving parts on any mechanical appliance, the time comes when a replacement is due, and a stylus will need periodic changing on a turntable.
This can seem like a daunting task but the truth is that it’s a relatively straightforward one if you follow some key steps, and take good care when changing a stylus.
I recently had to change the stylus on my turntable, so I put together a step-by-step guide (with pictures) to doing it, which I’ve shared below.
Why Is It Important to Change Your Record Player Needle?
When it comes to maintaining sound quality and protecting your records, a well-cared for stylus is essential. The stylus is the only part of a turntable that comes into direct contact with a record’s surface, so it needs close attention.
A turntable stylus, however well maintained, will wear down over time and need replacing. As this degradation of the stylus happens, there will be an effect on the sound quality of the records being played, as well as on the physical condition of the records.
For this reason it’s really important to maintain a clean stylus, keep an eye on its general condition (although this is hard with the naked eye and any degradation is also very gradual over time), and eventually switch it out for a new one.
How to Know When It’s the Right Time to Change a Record Player Stylus
While it’s not possible to give a “one size fits all” answer to the question due to the importance of the condition of the individual stylus in question, it is possible to make an informed call.
There are several factors that influence when a turntable stylus should be changed. These include: the stylus’ recommended lifespan as per manufacturer guidelines, its actual age, the hours of use it has had, its audible and visual performance and its general condition.
There are also some important audible and visible signs that, while not always easy to pick up on, do give a real indication. More on these below!
The Expected Lifetime of a Turntable Stylus
If well cared for, the general rule of thumb for the lifetime of a turntable stylus is approximately 1000 hours of playing time before it needs to be changed. If you were using your turntable for an hour a day this would mean roughly after two-and-a-half years.
Not all stylus manufacturers state the expected lifetime of their styli, but I’ve rounded up some of the major players who do here to show the variance in advice given:
| Brand | Recommended Stylus Lifetime | Brand Comments |
| Audio-Technica | Between 600 and 1000 hours | “When the diamond is worn out, (between 600 and 1000 hours) or if the cantilever becomes damaged, the stylus assembly needs to be replaced.” |
| Ortofon | Up to 2000 hours | “With proper care we find that up to 1000 hours is possible without degradation of performance. The stylus does begin to exhibit changes after 1000 hours, but the stylus life as a whole is expected to top 2000 hours.” |
| Roksan | 800-1000 hours | “The stylus should last around 800-1000 playing hours.” |
| Denon | 400 hours | “The supplied stylus is good for approximately 400 hours of playback.” |
| Nagaoka | 150-200 hours | “The stylus replacement interval varies depending on the using conditions, but for general use at home, the reference time is between 150-200 hours in which the stylus begins to wear and the tone quality deteriorates.” |
The Major Signs of a Worn or Damaged Record Player Stylus
Audible factors can be hard to discern and usually only become apparent very gradually over time. Likewise, visible factors can be hard to see with the naked eye and will often need some magnification of the stylus for you to be able to actually note anything that’s awry.
The key signs of a damaged turntable stylus can include: excessive sibilance, sound distortion, degradation in sound quality, skipping or bouncing, stylus misalignment, misshapen stylus head, and residue on the stylus.
Audible Factors:
| Factor | Sign(s) |
| Excessive sibilance | Hiss or static during record playback |
| Sound distortion | High and/or low frequencies sound bad (treble and bass don’t sound like you know they should) |
| Degradation in sound quality | Muffle, gradual drop in crispness and overall clarity of music playback |
| Skipping or bouncing | A stylus that’s skipping or bouncing on the record isn’t just frustrating when listening to your music, it’s a sign that either the alignment and set up of the stylus or the needle itself needs serious attention |
Visible Factors:
| Factor | Sign(s) |
| Stylus alignment | If the needle head of the stylus is misaligned, bent, has a jagged edge or any other visible defect. The same goes for the cantilever’s shape and angle |
| Needle head shape | If you have a spherical stylus, which is the most widely used type, and it has become more pointed, this is a sign of extreme stylus wear |
| Dirt or residue on stylus | If the tip of the stylus has black residue which is not easily removed with careful cleaning |
There’s no exact formula for working out precisely when a stylus should be changed, but by cross-referencing the general guidelines on stylus lifespan (per manufacturer guidelines) with the above pointers of what to be vigilant about, you should be able figure out when the time is right for a stylus refresh.
Something important to mention at this point is that if you’ve bought a second-hand record player or turntable, it’s a wise and highly advisable move to equip it with a brand-new stylus before you play any records on it for the first time.
It’s impossible to reliably know the age, hours of use and therefore true condition of the stylus beyond a visual inspection, so a stylus renovation is small but worthwhile investment.
I speak from lived experience here, after buying a second-hand restored Tonesta Olympic record player a good few years ago. I damaged a record on its first play, because I didn’t check (and change) the stylus before use.
Another quick tip here for being able to more easily pick up on the audible signs of stylus wear, is to have a “reference” record for noting any sound degradation on.
This means having an inexpensive or non-sentimental value record with which you’re really familiar, and on which you’ll be able to recognize any deterioration (distortions, lack of sound clarity, etc) caused by the stylus.
How to Change a Record Player Stylus: A Step-by-Step Guide with Pictures
Okay, it’s time to get into it! Here’s an easy-to-follow guide with photos that will help you through the process of changing a turntable stylus.
Depending on the kind of cartridge you’re using, replacing just the stylus may be possible. It all depends on the brand, but most moving magnet cartridges offer this option.
If removing the stylus alone isn’t possible due to it being integrated into the cartridge, then a new cartridge will be the way forward. Both eventualities are covered in the steps below.
Before you start on any of these methods, it’s important to remember that clean hands and avoiding touching the tip of the stylus directly are key! And of course, that cleaning your records regularly is a key factor in prolonging the life of your stylus.
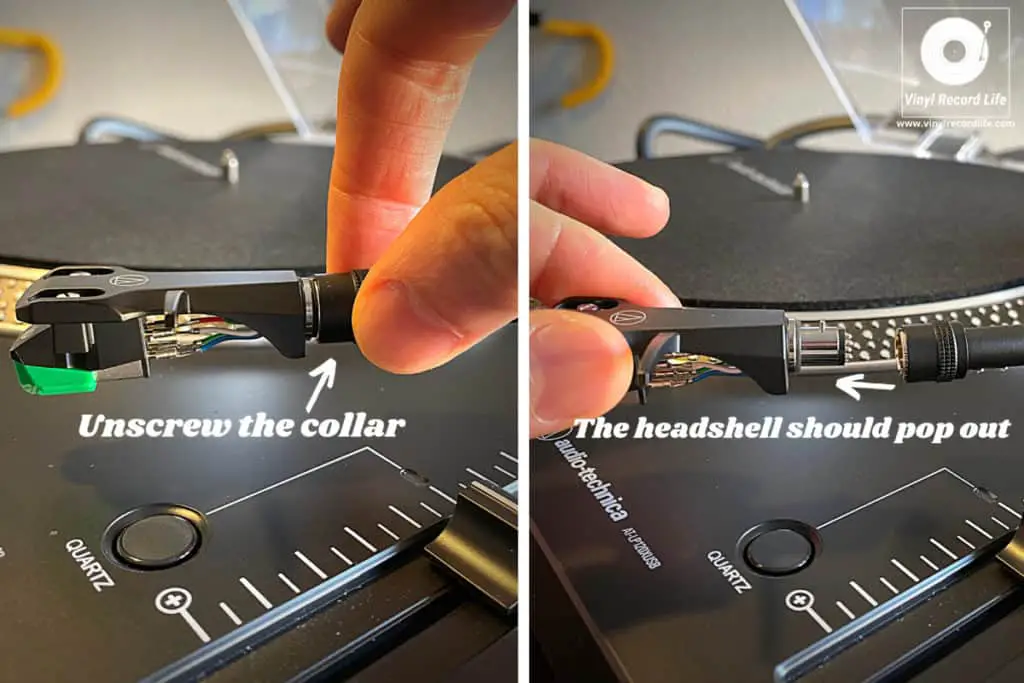
Step #1: Figure Out If the Headshell is Removable
The first thing you should always do is switch off and unplug the turntable.
If the tonearm has a removable headshell, then disconnect and remove it from the tonearm carefully as this will make the replacement of the stylus far easier.
If the headshell isn’t removable, you’ll need to ensure you keep the tonearm steady for the whole process by locking it in place with the locking clamp.
If there isn’t one, sometimes an extra pair of hands can come in handy here.
Step #2: Establish Which Stylus You Require
The stylus should generally have a serial or model number visible on it, which will make looking up a replacement to order straightforward.
If there’s no model number evident on the stylus, then a quick search of the instruction/set-up manual for your turntable or record player online should yield a result.

If you’re in any doubt, you can always ask for help in figuring out the appropriate replacement stylus from an expert or retailer. You may also want a stylus upgrade, in which case it’s likely you’ll already know which make/model you want.
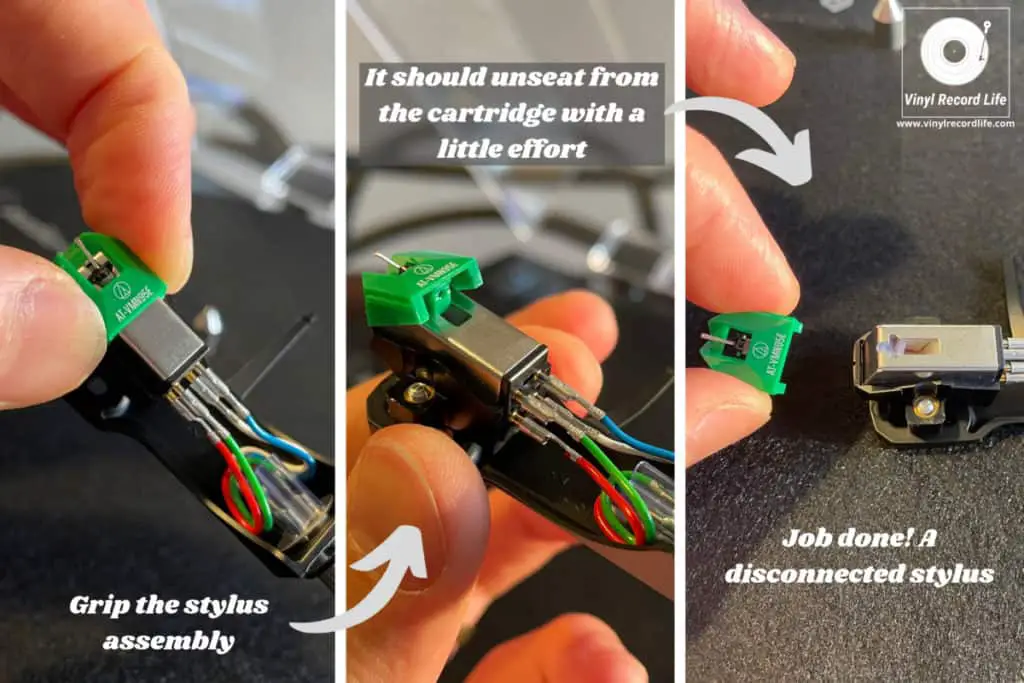
Step #3: Remove the Old Stylus from the Cartridge
Once you’ve got the new stylus, it’s time to remove the existing one from the cartridge.
Grip the stylus assembly between your forefinger and thumb, and gently but firmly pull the stylus assembly away from the cartridge. This may take a little effort, but it should clip out.
Step #4: Attach the New Stylus to the Cartridge
The new stylus should come with a set of instructions, so give these a close read to check if there are any specific pointers around the model you’ve purchased.
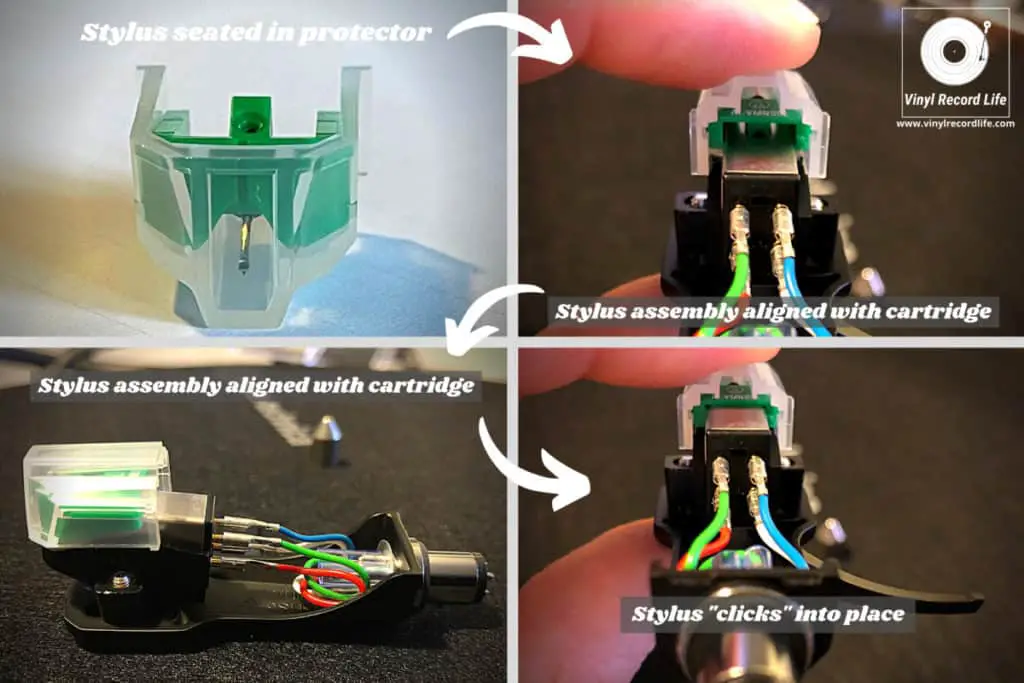
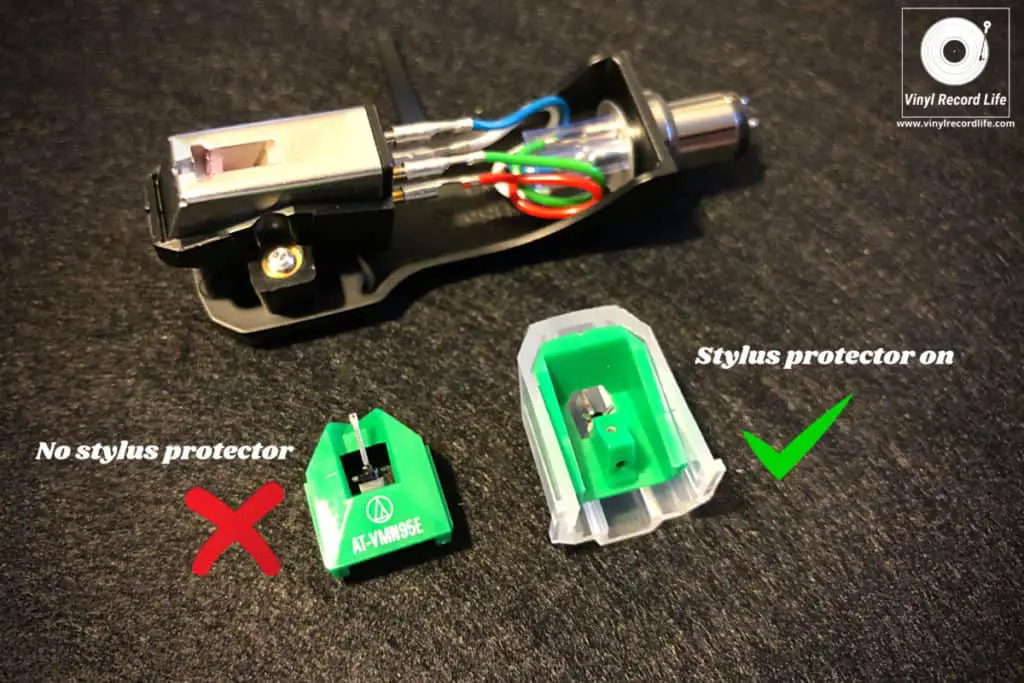
To attach the new stylus, first make sure the new stylus is properly seated in its protector. Then, grip it by its side as in the previous step, and align the underside of the stylus with the cartridge body, ensuring any tabs and openings are properly lined up.
Next, ease the stylus assembly into the cartridge body and gently apply some pressure until it clips into place. The new stylus should now be ready to go.
Step #5: Reattach the Headshell if Necessary
If you removed the headshell for this process, reattach it to the tonearm and secure it.
As long as the tonearm’s counterweight stayed in place throughout, rebalancing the tonearm or resetting the tracking force shouldn’t be necessary. Now you can remove the stylus protector.
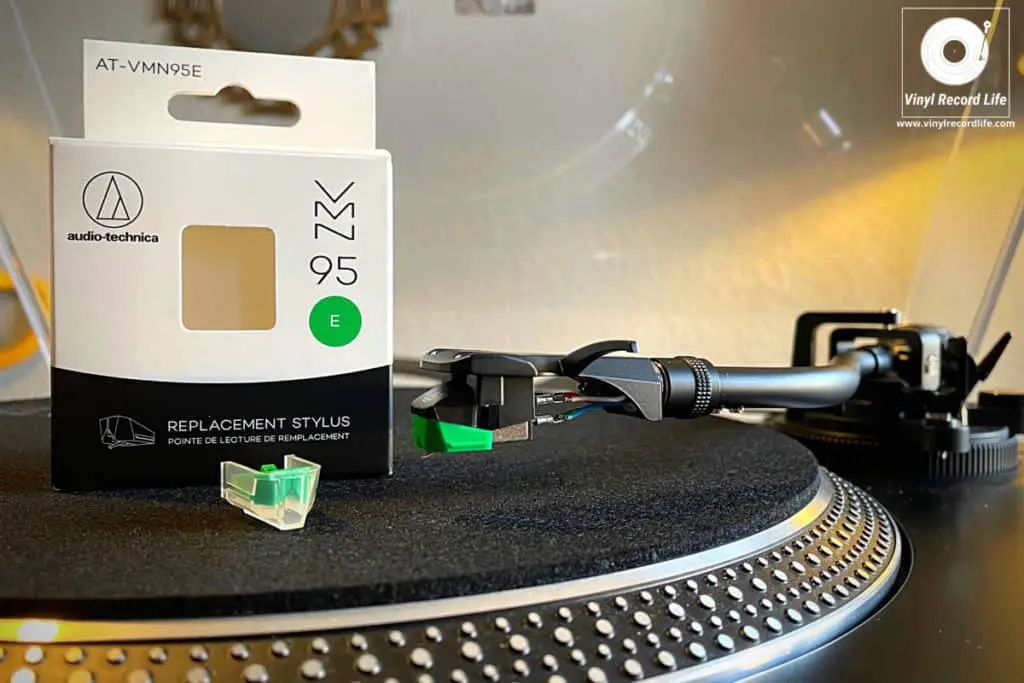
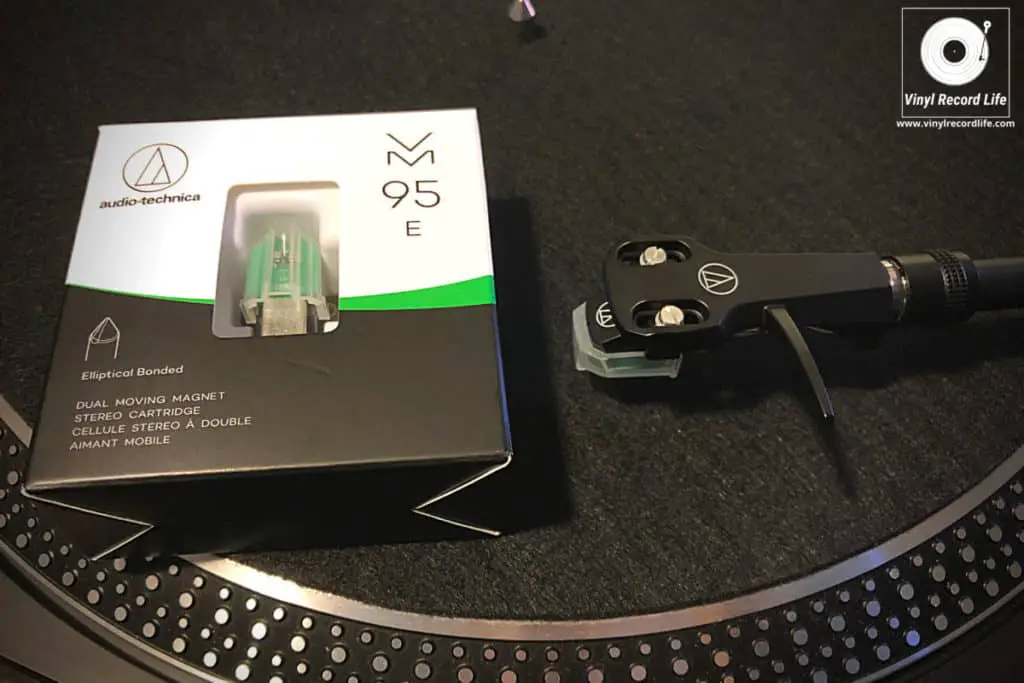
You can find the Audio-Technica AT-VMN95E cartridge with stylus I use in the above demo here.
Replacing the Cartridge Entirely on a Turntable: A Step-by-Step Guide with Pictures
Step #1: Remove the Old Cartridge from the Headshell and Establish Which Model You Want or Need
A quick look at the instruction manual for the turntable can sometimes reveal the cartridge model number, but in any case you’re going to need to remove the existing cartridge from the headshell to replace it with a new one.
On some cartridges, it’s not possible to identify the model serial number until they’ve been removed from the headshell, so this is likely to be the first thing you’ll need to do.
Refer to Step #1 in the stylus replacement steps above for information on how to first remove the headshell from the tonearm, if your turntable model allows this.
To remove the cartridge from the headshell, you’ll need a small flathead screwdriver.
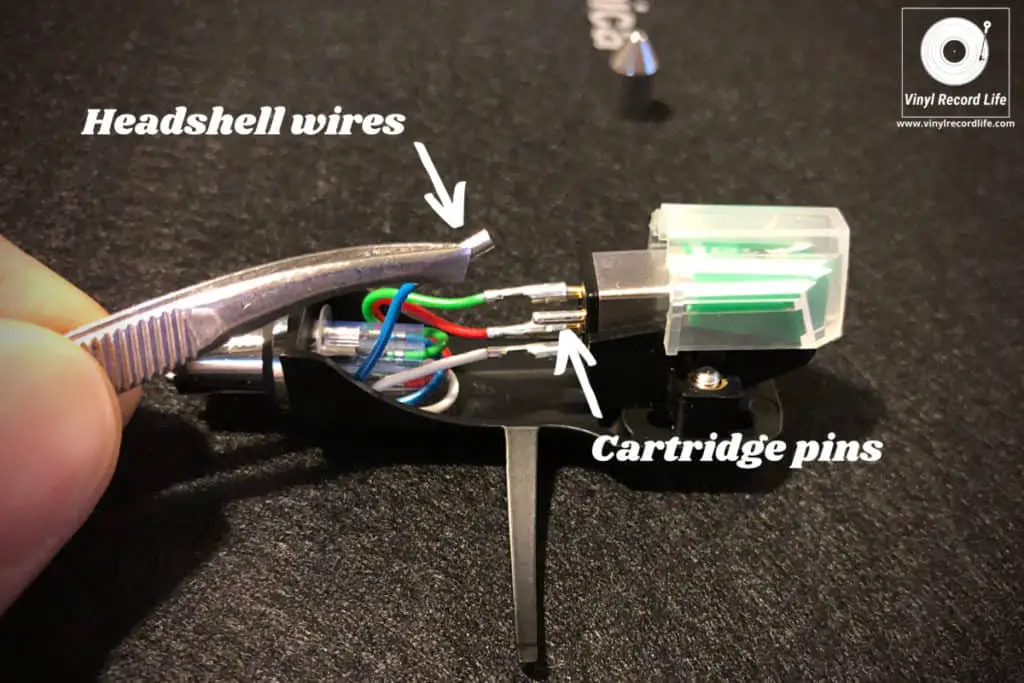
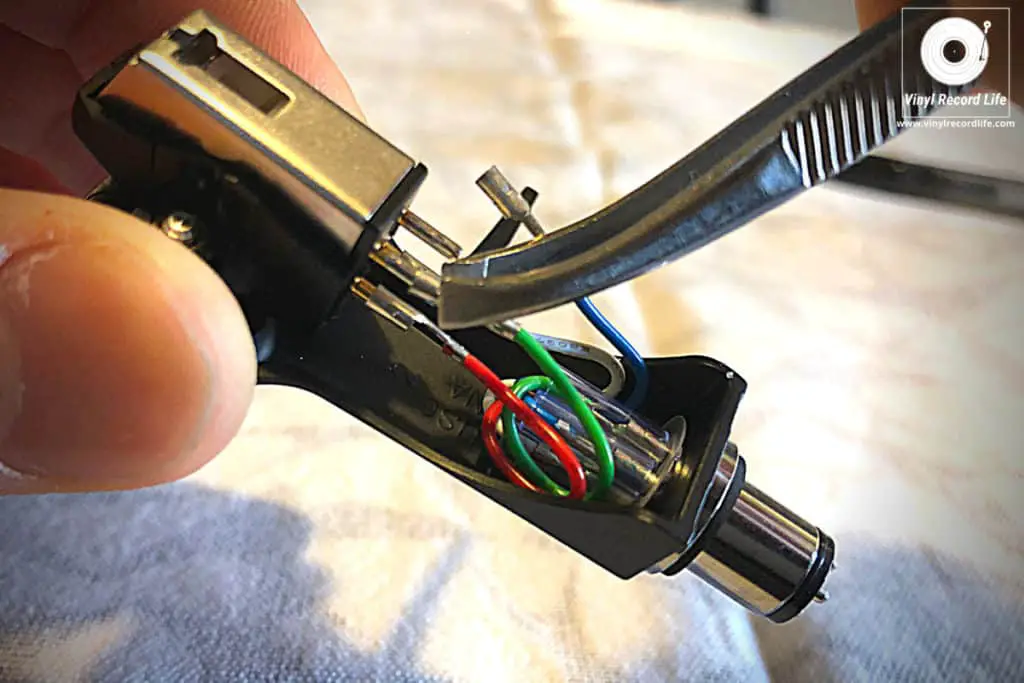
Unscrew the small screws which attach the cartridge to the headshell, and be careful not to let it fall as there are small wires which connect to the cartridge.

Then, you’ll need to gently disconnect these wires from the cartridge, and a pair of tweezers can be very useful for this delicate job.
Before you disconnect the wires, make sure you note down which color wire connects to which pin, so that you know which wires to reconnect where on the new cartridge. I usually just take a photo for visual reference.
Now, you should have the old cartridge completely disconnected from the headshell.
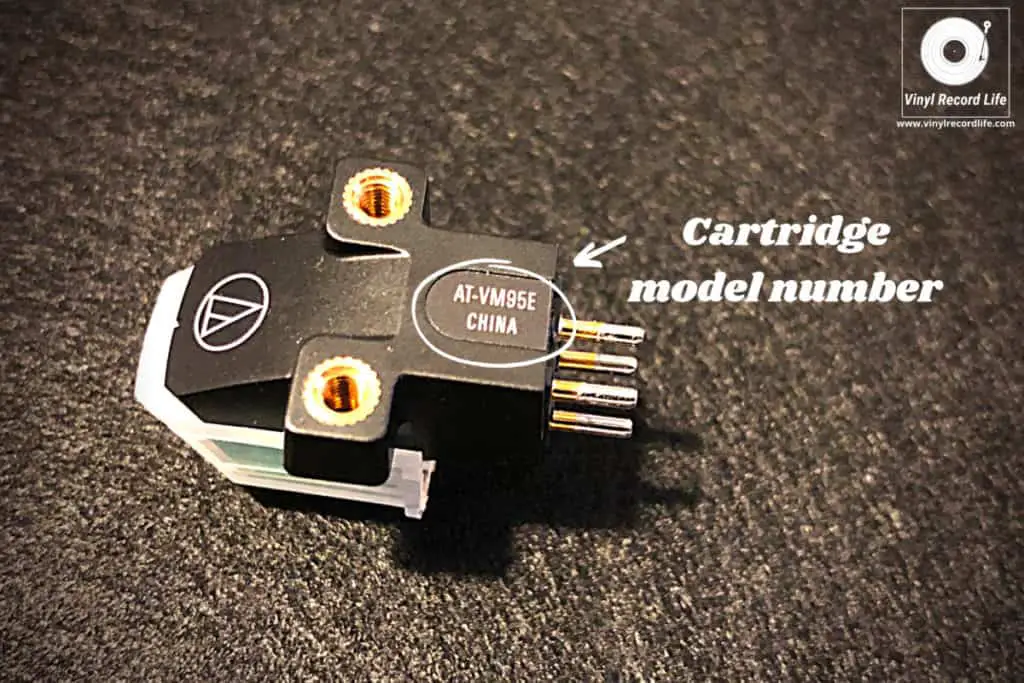
Establish the model number of the replacement cartridge you need by inspecting your existing cartridge to get the relevant info.
It may also be the case that you want to upgrade the cartridge, so it’s likely you’ll already have done some research on which model you want.
Step #2: Remove the Stylus from the New Cartridge Before Installation
To avoid any accidental damage to the new stylus while installing the new cartridge, remove it before you attach the cartridge to the headshell.
Before you do anything, though, make sure you read the installation instructions that come with the new cartridge. Also, ensure the stylus protector remains on throughout this entire process.
Gently grip the stylus assembly between your forefinger and thumb, and then ease it out of its seating in the cartridge. See Step #3 from the stylus replacement steps further up the page for images on this.
Put the new stylus to one side in a safe place.
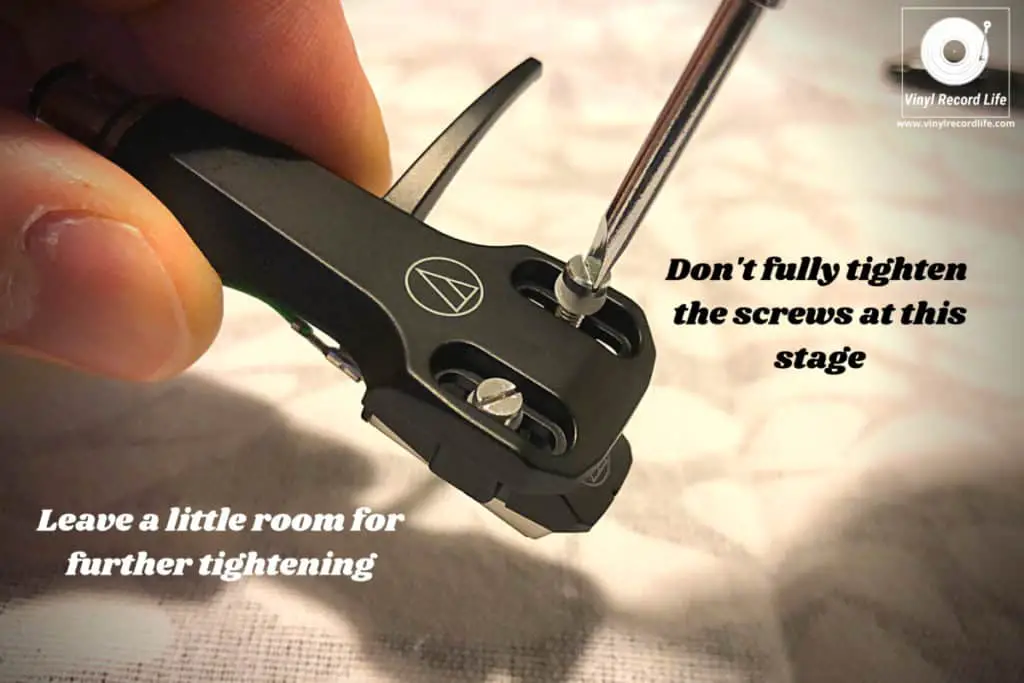
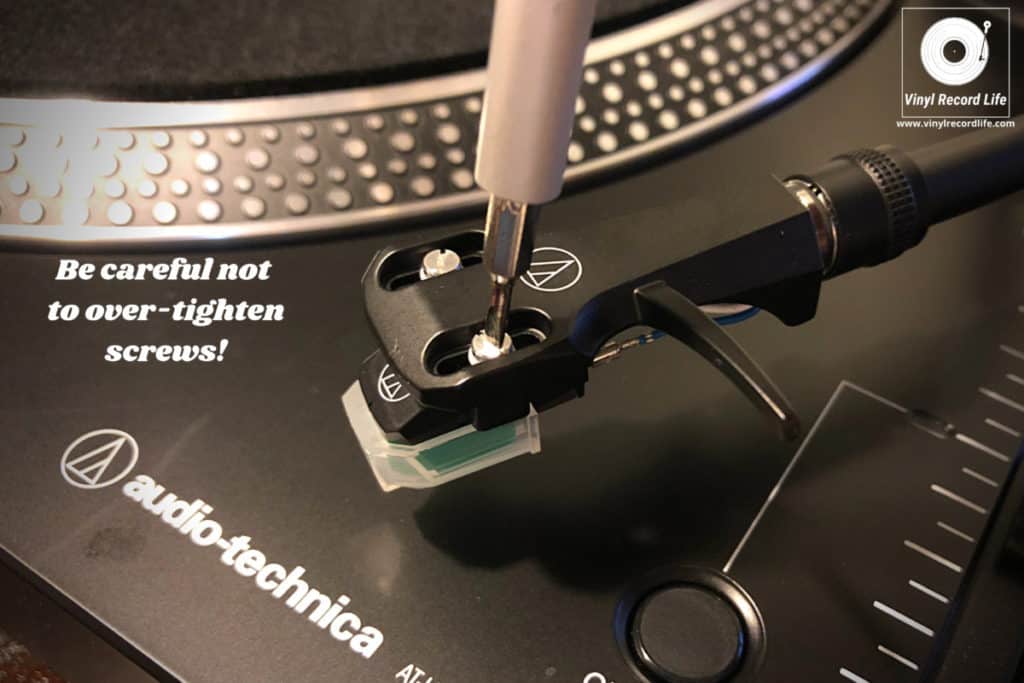
Step #3: Attach the New Cartridge to the Headshell with Screws
Now you need to install the new cartridge by lining it up on the headshell, and using the small screws and flathead screwdriver from Step #1.
At this stage, you don’t want to tighten the screws too much – only enough to keep the cartridge in place but allow a little flex for adjustments.
Step #4: Attach the New Cartridge’s Pins to the Headshell Wires
Using your tweezers, reattach the headshell’s wires to the pins on the new cartridge, making sure you connect the correct wire to the corresponding pin as per the notes you made in Step #1.
Take extra care when doing this step, as the wires can be easily damaged!
Step #5: Insert the Stylus back into the Cartridge
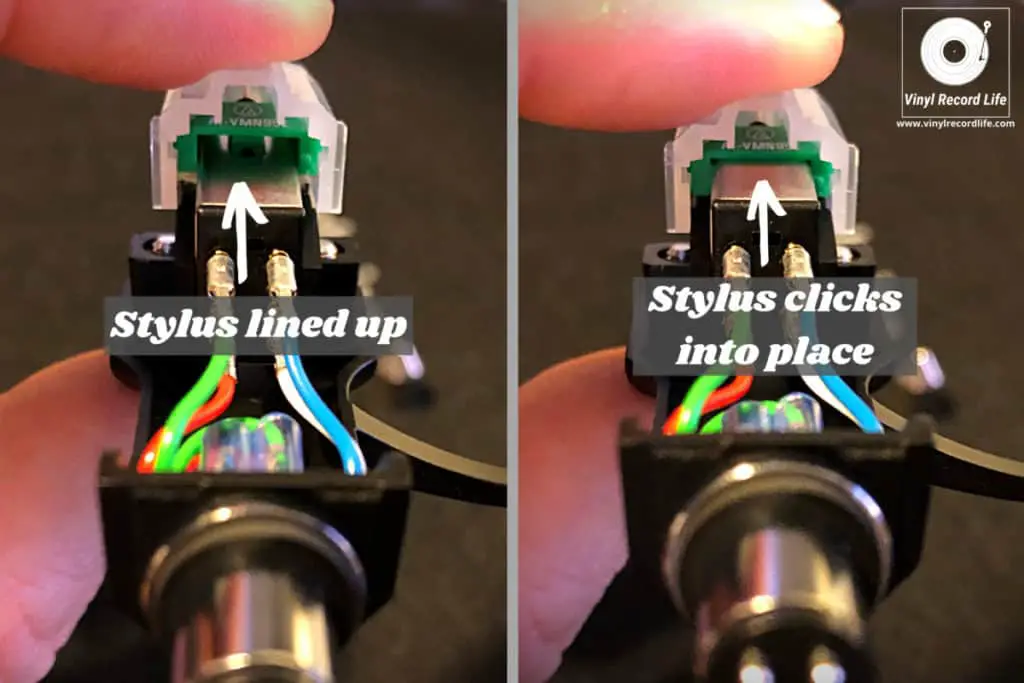
Making sure the stylus protector is still properly in place, you can now reattach the stylus assembly to the cartridge.
Take the stylus assembly between your forefinger and thumb, line it up with the cartridge, and slot it back into its seated position. It should click back into place.
Step #6: Reattach the Headshell to the Tonearm
If you removed the headshell from the tonearm, you can now reattach it and secure it in place.
Step #7: Ensure the Stylus is Correctly Aligned
Aligning the stylus is an important step, and the first thing you should make sure of is that the stylus overhang is correct. The correct measurement should be stated in the instructions that came with the stylus, but is usually between 15mm and 16mm.
Stylus overhang refers to the distance between the tip of the stylus and the center spindle on the turntable, when the headshell is positioned directly over the spindle.
This can be measured with either an overhang gauge or a digital caliper, and if you’ve bought a whole new pre-mounted cartridge and stylus assembly the overhang will most likely have been preset at the point of manufacture. In any case, most manufacturers have instructions on their websites for stylus alignment which you can easily track down.
The other step in aligning the cartridge is ensuring the stylus remains as tangent to the record groove as possible when tracking the groove.
You can do this using the paper protractor method, which involves printing out a special protractor to scale and then placing it on the turntable platter and lining up the stylus with the markings.
Paper protractors come with instructions printed on them and some manufacturers have them available on their websites. Audio-Technica (click here for pdf) and Fluance (click here for pdf) are two who make theirs freely available.
Step #8: Tighten the Headshell Screws
Once the cartridge and stylus are aligned, you can tighten the headshell screws to firm up the cartridge. Make sure you don’t over-tighten them.
Step #9: Final Checks
Give the tonearm set-up instructions for your specific model a quick check over to ensure the tracking force and anti-skate are all good to go before you play any records.
If the tonearm’s counterweight stayed in place during the process, then rebalancing the arm or resetting the tracking force shouldn’t be an issue.
Now you should be good to give your new stylus its first spin. Enjoy!
You can find the Audio-Technica AT-VM95E headshell and cartridge combo I use in the above demo here.