Record brushes are often used too infrequently, regularly overlooked or simply forgotten when it comes to taking care of a record collection, but they’re an essential and inexpensive piece of kit that can help keep your records in great shape for many years.
Using a record brush pre- and post-play should become a part of any record-playing routine, as it helps achieve the best possible listening experience.
To use a vinyl record brush, place the tips of the brush onto a spinning record surface. The brush should run perpendicular to the record grooves. Apply enough pressure for the tips to touch the record surface, but ensure the bristles do not bend. Hold in place for 3-4 revolutions of the record.
Then, lift the brush off the record’s surface, and give it a clean by flicking the handle back and forth across the bristles. Never touch the bristles of the brush.
Read on four our full guide on how to use a record brush to its best effect. In this article we’ll cover why it’s important to use a brush on vinyl records, the different types of brush there are, as well as the steps to take when using each brush.
Everything you need to know about record brushes is here!
Why It’s Important To Use a Record Brush
A record brush has some major benefits for your record:
- It removes dirt and dust that affect the sound quality and which can also cause lasting damage to both the record and the playing equipment.
- It dissipates the static electricity charge which builds up on a record. This static also affects sound quality, and attracts dust and other debris to the record’s surface.
- It reduces the need for more frequent deeper cleaning of the record, and while it doesn’t totally eliminate this requirement, it does have the effect that it helps to maintain the record in a much cleaner condition between more intense cleans.
Using a brush before and after playing a record should become part of a “best practice” routine.
For more on how to safely clean your records, including how to clean them with a cleaning solution, check out our detailed guide on cleaning vinyl records.
The Types of Record Brush Available and What They Do
There are a few different types of vinyl record brush available, and they offer slightly different benefits, so it’s helpful to understand them.
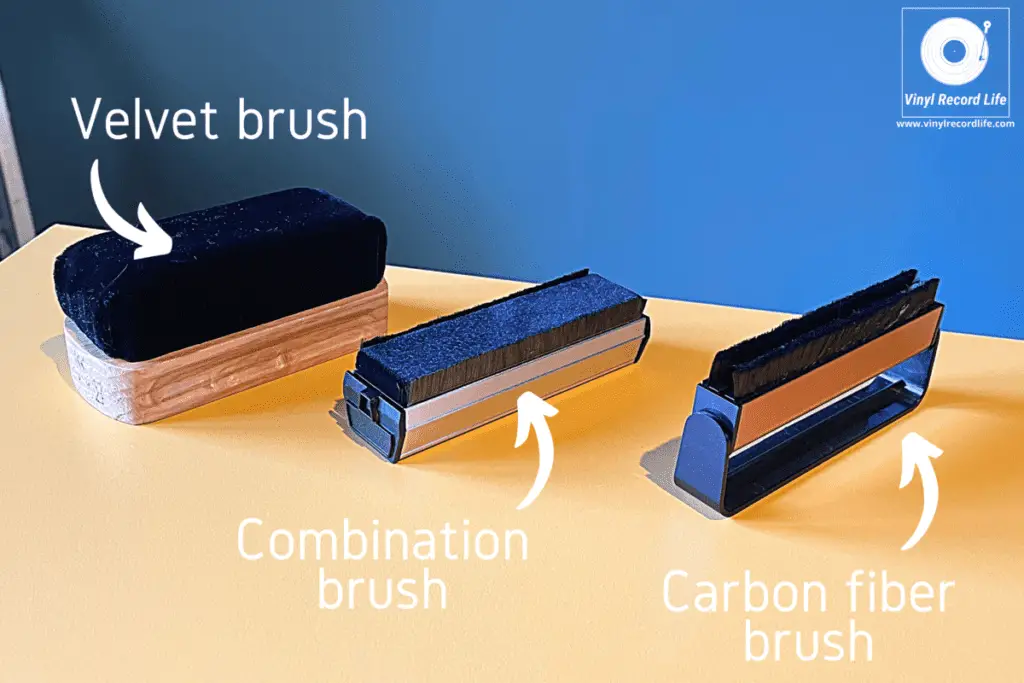
Carbon Fiber Record Brushes
A carbon fiber vinyl record brush is especially good for helping to remove the static electric charge that builds up on records.
The bristles of this type of brush are made from carbon fiber, a material which is widely applied in many other products such as flooring, and which acts as an anti-static agent.
The carbon fiber bristles “capture” the static charge from the record, and a conductive plastic body part of the brush helps to prevent any static charge from building up.
In addition, a carbon fiber record brush will also remove any loose dirt, dust or debris from the record surface. Intended for daily use, it does a good job of removing this superficial dirt and minimizing static charge, but it doesn’t get deep enough into the grooves to extract all the dirt that may be lying within.
Velvet Record Brushes
A velvet record brush doesn’t always have anti-static properties, and is generally better at getting into the grooves of the record and collecting whatever dirt matter may be lying in there.
Often, velvet brushes are used with a small amount of cleaning solution, to aid both the collection of the dirt and also to help reduce the static build up.
The method for using a velvet brush is also slightly different to that of a carbon fiber record brush, and we’ll outline this in the steps below.
Microfiber Record Brushes
A microfiber record brush is similar to a velvet brush in appearance, and is effectively the same thing but with a microfiber cloth stretched over where the velvet would sit.
Microfiber brushes can also be used with a small amount of cleaning solution for optimum results, and have similar results to velvet brushes.
Combination Record Brushes
A combination record brush is effectively a velvet brush with a thin row of microfiber bristles along each side.
It provides a neat solution as it offers the benefits of both a carbon fiber and a velvet brush, although personally I feel that the velvet element of these combination brushes isn’t able to be utilized properly.
For all brushes, you should never touch the bristles, velvet or microfiber fabric of them, as this will contaminate the brush with oils and dirt that are on your fingers. This will then be transferred onto the record, and over time will cause the degradation of the record’s surface.
If you’re looking for a record brush, I recommend getting this KAIU cleaning kit. It’s great value, includes record and stylus cleaning solution, and most importantly also contains two record brushes: one velvet, and one carbon fiber. I’ve been using these for a while now and can vouch for their quality – these are the brushes you’ll see used in the photos below.
A Step by Step Guide To Using a Carbon Fiber Brush for Vinyl Records
To get the most out of a carbon fiber record brush, follow these steps.
Step #1: Get Your Brush Ready and Spin the Record
Give the brush a quick clean to remove any dust that may have accumulated by flicking the movable handle back and forth over the bristles, making sure you don’t accidentally touch the bristles.
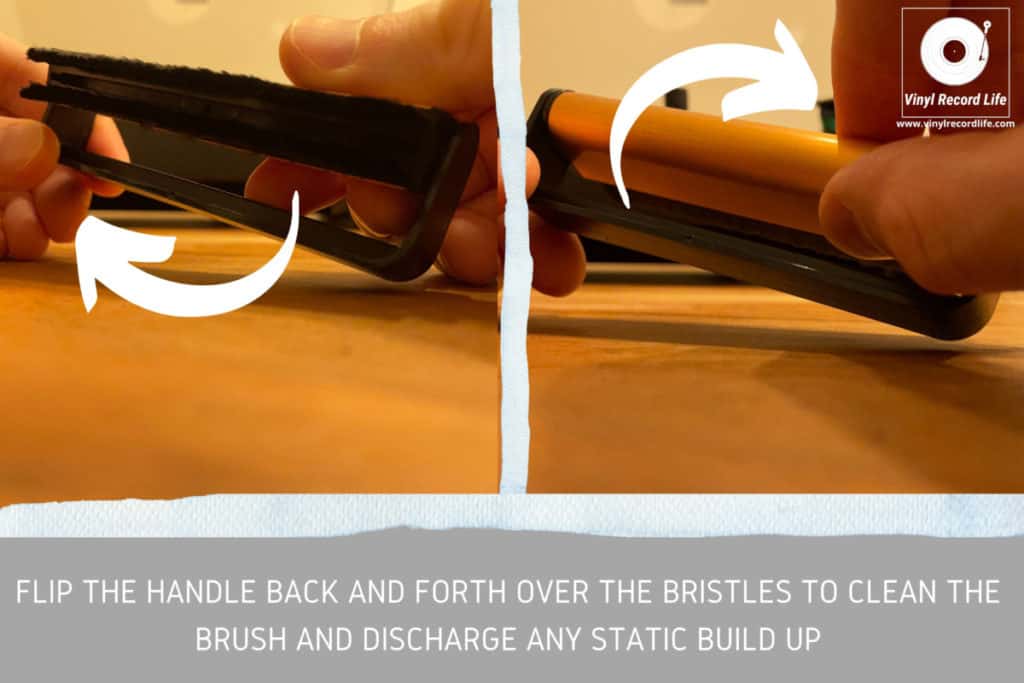
When that’s done, set the record spinning on the turntable.
Step #2: Placing the Brush on the Record
With the record rotating, place the tips of the bristles gently onto the surface of the record and hold the brush steady. The brush should be perpendicular to the direction of the record’s grooves.
The tips of the bristles should be touching the surface of the record with a light enough amount of pressure to maintain contact, but without bending the bristles. It’s the very tips of the bristles that need to get into the grooves and collect the dust and dirt.
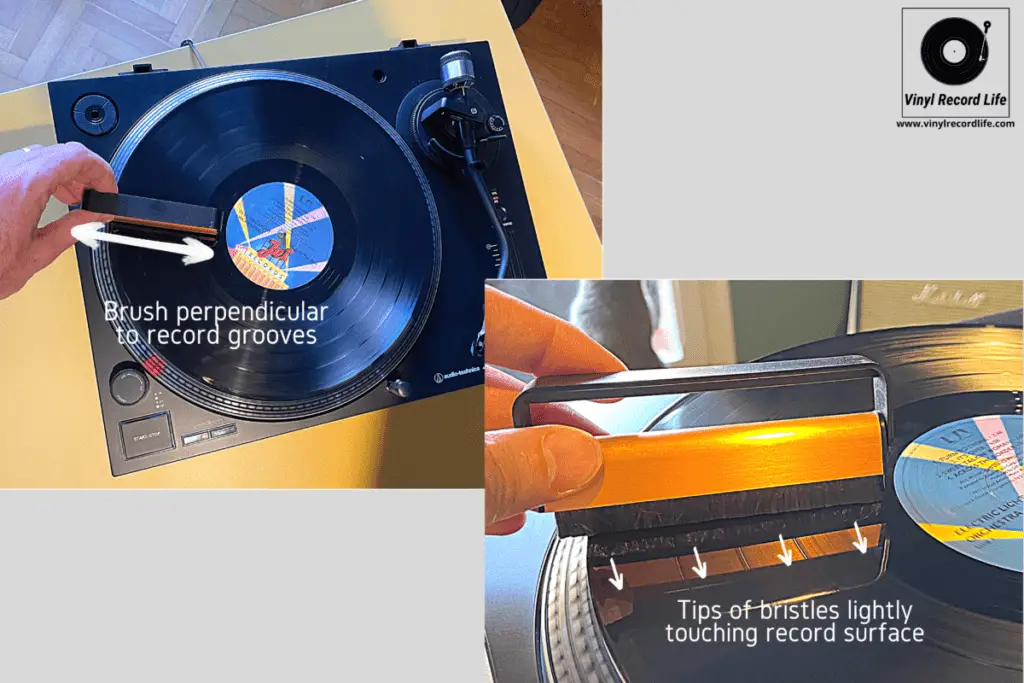
Angle the brush slightly so that the bristles are able to easily flow in the same direction as the record is spinning. Hold the brush steady and in the same position for 3-4 revolutions.
Step #3: Removing the Brush From the Record
Once 3-4 revolutions of the record have passed, gently “scoop” the brush directly upwards and off the record’s surface.
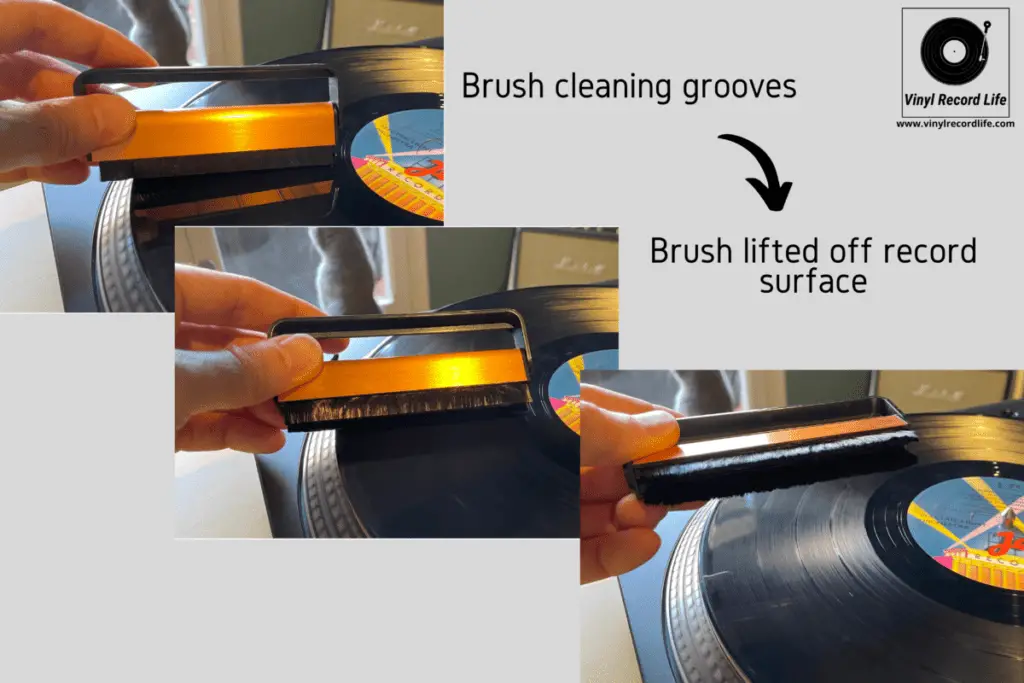
Some record enthusiasts advocate for sliding the brush – with the bristles still in contact with the record – across the record’s surface either towards the center spindle in order to dissipate the static, or away from the center and towards the record’s edge.
Personally I like to avoid both of these methods and just lift directly off. Sometimes it does leave a bit of dust on the record’s surface, but I just repeat the process a few times.
I prefer doing it this way as sliding towards the center or edge of the record both drag whatever dirt has been collected by the brush across the record’s grooves.
Step #4: Cleaning the Brush and Repeating
Now that you’ve lifted the brush off the record’s surface, you can clean it by moving the body of the brush back and forth across the bristles. This helps flick off any dirt and dust, and also clears any remaining static.
You can repeat this whole process as many times as you feel is necessary, depending on the cleanliness and condition of the record. I like to do it twice, unless the record is particularly dirty, in which case I will keep repeating until I’m satisfied.
Carbon fiber brushes are good at collecting dust, but not necessarily at retaining it, so this repetition is necessary to ensure you’re clearing the record of as much dirt as possible.
A Step by Step Guide To Using a Velvet Brush for Vinyl Records
The process I use for a velvet record brush is slightly different to that of a carbon fiber one, and these are the steps I take.
Step #1: Place the Record on a Flat Surface
I place a clean cloth on a hard, flat surface to protect the record before I begin.
The reason for not cleaning a record with a velvet brush while on a spinning turntable is because you need to apply a little more pressure to the velvet brush, and doing this while the record is on the turntable could cause damage to the equipment.
As the velvet brush has the potential to clean deeper into the record’s grooves than a carbon fiber brush, thanks to the better contact it obtains, it’s necessary to press slightly harder with the brush when cleaning.
Step #2: Gently Drag the Brush Around the Record, Following the Grooves
Place the velvet brush on the record’s surface, and move it around the record, following the grooves and applying a little bit of light pressure, for a full revolution of the record.
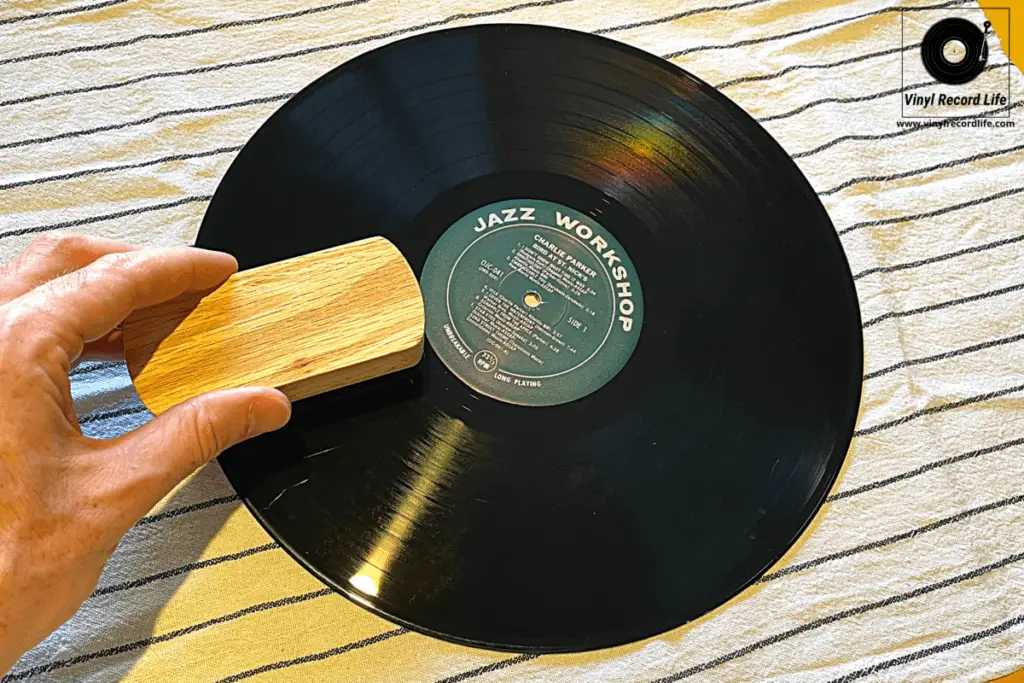
Step #3: Lift the Brush off the Record’s Surface
Once you’ve completed one full revolution of the record, carefully tilt the brush to a 45º degree angle and lift it off the record.
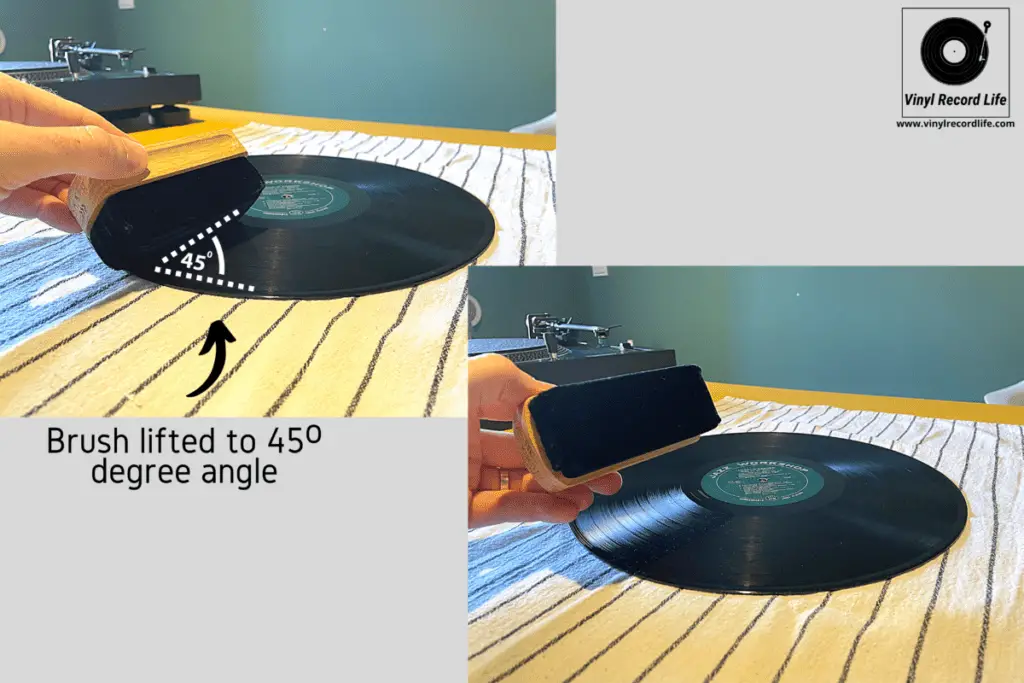
Now clean the velvet brush with either an anti-static cloth or a special smaller brush, which often comes with the velvet brush.
Now repeat steps 1-3 as many times as is necessary to get the record to a level of cleanliness that you’re satisfied with.
A velvet brush can be used for a light wet clean too. All you need to do is spray a little bit of cleaning solution onto the record’s surface as part of the first step.
Using a Brush To Clean Vinyl Records: A Final Word
As outlined above, using a record brush before and after playing your records will benefit them not only for the play you’re listening to, but also in the long run too.
I use a carbon fiber brush before and after every use of a record, and I’ll use a velvet brush with a little cleaning solution on a record I may have used a few times in a short space of time.
It’s also good to think of using a record brush as a light bit of maintenance work, but not as a full-on cleaning solution.
Use your record brush to keep your records clean on a daily basis, but for a deeper clean every so often you’ll need to use a cleaning solution.
